


Setting Up a Static Website Using AWS S3
Create a Static Website using AWS S3

This is part 1 of a 3 part series on setting up a static website using Amazon Web Services. Let’s begin with AWS S3.
Part 1 - Setting Up a Static Website Using AWS S3
If you do not already have an AWS account, you can sign up here: AWS Account Sign Up
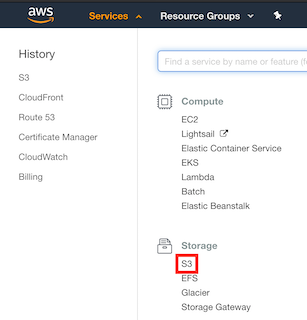
Once you have signed up, you can access all of the AWS services you have at your disposal using the Services dropdown in the top menu bar.
Go ahead and click on the S3 service under the Storage section.
Creating an S3 Bucket
Once in the S3 configuration page, go ahead and click on the +Create Bucket button to create a new bucket.
An S3 bucket is like a big folder that you can store and share files from. This bucket will store all of the files associated to your new website.
You will want to set up this bucket name to be the same as the URL name you wish to use for your site, as in my example: cdputnam.com. (Also ensure that this bucket resides in the US-EAST-1 region as this is important for later configurations with AWS CloudFront and Certificate Manager services.)
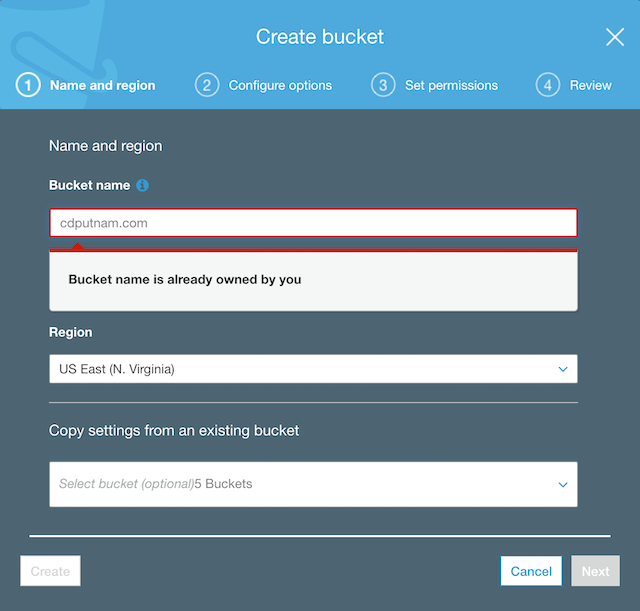
As you can see, your bucket name needs to be unique. If you already own a domain for your website, then you know it is unique. If not, then try and find something unique that you will remember for now.
You can use the remaining default settings to finish creating the new bucket as we will be changing them selectively later on.
Now that the bucket is created, go ahead and click on it in the bucket list. You should now be able to upload any files you like to this bucket.
Let’s make something a bit more unique than a ‘Hello World’ type page, so go ahead and create a sample HTML page called index.html that we can upload into this bucket for testing purposes with the below code in it.
<html>
<body>
<h1>I am an H1!!</h1>
<p>Paragraph</p>
<input type="text" name="field1"/>
<button>Click me</button>
</body>
</html>
Now upload this page into the bucket so we can test using this HTML page!
Serving the Web Page from your S3 bucket
From the main page of your new bucket where you uploaded the index.html page from, go ahead and click on the Properties tab. Then click on the Static Website Hosting box to open up the settings to enable hosting your website from this S3 bucket.
Enable the option to use the bucket to host a website.
Ensure that the Index document field has index.html populated in it and ensure the Error document field has something like error.html populated. These fields may show grayed text by default, but you need to actually type in the names you want to use for these two documents.
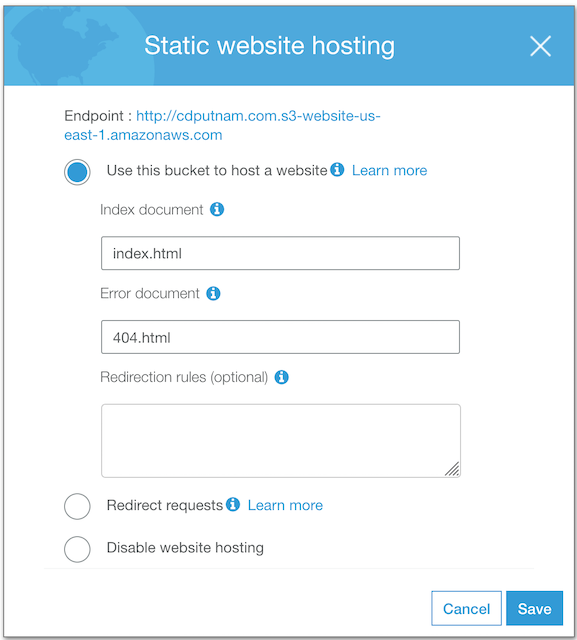
Finally, click on Save to put these settings into place.
Hey, I should now have a website right? Well…. no. You may have this set up to host website page files now, but can the public actually see them? Nope, because we need to set up the permissions to allow them to read the web pages from this bucket!
Setting Up Permissions for the Public to View your Site
From the main page of your new bucket where you uploaded the index.html page from, go ahead and click on the Permissions tab. Then click on the Bucket Policy tab that appears below it.
Here we can use JavaScript Object Notation (JSON) to configure the access policies for the contents stored in the bucket. Since we want to serve a webpage from the bucket, we need the public to be able to GET all the content in the bucket. But they certainly do not need any more permission like being able to add new files to the bucket or edit your existing webpage files!
To do so, you can add in a bucket policy like the one below, replacing YOUR_BUCKET_NAME with the name of your actual S3 bucket.
{
    "Version": "2012-10-17",
    "Statement": [
        {
            "Sid": "AllowPublicGet",
            "Effect": "Allow",
            "Principal": "*",
            "Action": "s3:GetObject",
            "Resource": "arn:aws:s3:::YOUR_BUCKET_NAME/*"
        }
    ]
}
Make sure to save this policy and now your files should be readable by the public.
Time for testing!
Accessing Your Web Page
To access your web page, you need to use the URL of the bucket, which can be found again on the Properties -> Static Website Hosting configuation page. It would look something like this:
http://cdputnam.com.s3-website-us-east-1.amazonaws.com
Click on your link and it should load up the testing index.html page we created and uploaded earlier!
But wait, that URL is not the one I want to use. That is a really complex URL made by Amazon! Yes, this is true. Right now, you are hosting your web pages over AWS S3, but you are not using a custom domain URL or using HTTPS.
In the next post, I will cover how we can now look at setting up some additional AWS services to allow you to host your static website from S3 using a custom domain and also over HTTPS with an SSL certificate.

Share this post
Twitter
Google+
Facebook
Reddit
LinkedIn
StumbleUpon
Pinterest
Email