


Hosting your S3 Website using a Custom URL
Hosting your S3 Website using a Custom URL

This is part 2 of a 3 part series on setting up a static website using Amazon Web Services. In order to host your site on your own domain, you will need to purchase a custom domain, as in my case, my site is hosted at: cdputnam.com.
Part 1 - Using Route53
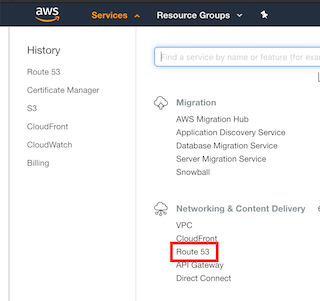
Using the Services dropdown in the top menu bar, go ahead and click on the Route53 service under the Network and Content Delivery section.
Purchasing a Custom Domain for your Site in Route53
Once in the Route53 configuration page, go ahead and click on the Registered Domains link in the sidebar under Domains.
On this page, click on the Register Domain button at the top of the page.
Here, you can search for and find an available domain for you to purchase and have for your own to use for your site. You can also see a dropdown showing how much each root domain will cost you. Most websites are hosted on the .com root domain, but there are many other common ones you can use such as: .net or .org. The pricing for each root domain can also vary.
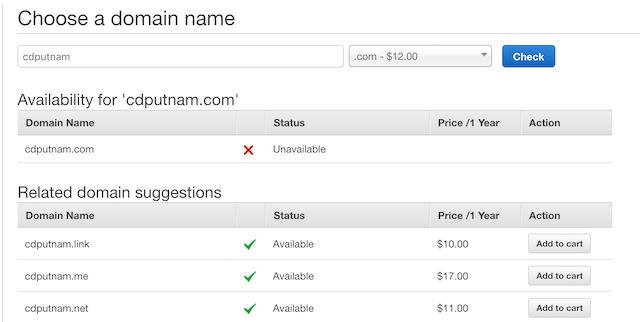
Once you have found and chosen a custom domain for your website and selected how long you wish to reserve and purchase this domain for, click Continue.
This section is important, if you are registering as a Person, then fill in your contact details. Ensure that the email address you input is correct as AWS will send you a verification email with a link that you must click on within 15 days to complete the validation and purchase of your new custom domain. If you input the wrong email address, then you will not be able to complete the purchase and take ownership of this new custom domain.
Once you have verified and completed the purchase steps, you can now see this domain under Pending Requests. It can take some time for the internet registrar services to propagate this new domain and the associated ownership details. Once the registration is completed, the domain will show up under the Registered Domains section.
This can take up to an hour or more to complete at times, so be patient. Once this is completed, you can continue with the next steps.
Using AWS CloudFront
AWS CloudFront is a Content Distribution Network (CDN) that allows for website content to be cached at various data centres around the world that Amazon controls. This allows for faster loading of your web site content, especially for images or other larger files, as it will automatically use the servers nearest to the person accessing your site.
Conviniently (or inconviniently as the case may be) using CloudFront is the only method to service HTTPS requests for a static website from and S3 bucket. So we will need to use CloudFront to serve the content of your S3 bucket.
You can find the CloudFront service under the same Network and Content Delivery section that you found Route53.
From here, click on Create Distribution to create a distribution network for your static website content. Ensure you select the Web distribution option since we are serving web content.
Now, here is a special situation where AWS does not take it’s own rule into account when trying to help auto-populate values for you.
For the Origin Domain Name, if you click on the link, you will be shown a list of S3 buckets that could be hosted as your origin files for the distribution network. You can select the appropriate S3 bucket from the dropdown here.
(NOTE: AWS has a bug where sometimes selecting the auto-populated option for this field does not actually work to serve your S3 bucket content. If after following the remainder of this tutorial your site does not load with an 403 Access Denied type of error, come back to this setting field and use the full URL for S3 bucket.)
Example:
AWS auto-populated: example.com.s3.amazonaws.com
Direct, Region spcific S3 URL to use: example.com.s3-website-us-east-1.amazonaws.com
Leave the next few field blank to use defaults.
For Viewer Protocol Policy, select ‘Redirect HTTP to HTTPS’. This ensures all requests get routed to use HTTPS traffic. Google Chrome and other browsers will be flagging all sites not using HTTPS as unsafe soon, so ensuring your site is up to security standards gives your site some extra credibility in it’s configuration.
For the Compress Object Automatically option, I would recommend selecting ‘Yes’. This automatically can compress some image types without much if any quality loss and also bundles and compresses JavaScript payloads limiting the amount of data and network exchanges required to load your site. The faster your site loads, the better for your readers.
If your readership will only be in North America, you can change the Price Class field options, but I would recommend leaving this to default for best performance as the price difference is marginal as of writting.
An important field here is the Alternate Domain Names field. Here ensure you cover all domain name uses your site could have. I would recommend covering the base domain, adding www. to the beginning of your domain, and also including the wildcard prefix to the domain per my example below:
cdputnam.com,www.cdputnam.com,*.cdputnam.com
Since we do not have a custom SSL certificate yet, you can leave the default CloudFront certificate option selected for now. We will come back and edit this configuration later.
CloudFront will also need to know which object/file to load by default when loading the default URL. This is set under the Default Root Object field and should match the Index document set for your S3 bucket: index.html.
Click on Create Distribution to continue.
Now you can grab a cup of coffee or go make some lunch as the creation of this distribution network across all of the data centres Amazon controls across the world can take a while. I have seen this take up to an hour for S3 buckets hosting large files or a large amount of content.
Creating a Hosted Zone in Route53 pointing to CloudFront
In Route53, create a new Hosted Zone for your custom domain.
Once the Hosted Zone is created, click on Create Record Set and a new side panel should appear.
Ensure the name shown under the name field is your root custom domain, like for my site: cdputnam.com
The Type should be an ‘A’ record.
Select ‘Yes’ for Alias and then for the Alias Target select your CloudFront distribution network item. Then click on Save Record Set.
Repeat to create another A record for the www. version of your custom domain. Each should point to the same CloudFront distribution.
Accessing your S3 hosted site over CloudFront
Once the status of your CloudFront distribution is set to Deployed and your Route53 Hosted Zone is created, you are set to begin testing access to your site.
Try going to the https:// URL of your site and see if your content loads. Most browsers will likely pop up with a warning about the SSL certificate being used for your site is set for cloudfront.net domains and your domain is not a cloudfront.net domain.
For now, have your browser proceed and continue to load up your site. If your content loads, then your CloudFront configuations were successful. If you get a 403 Access Denied error, see the above area where I cover what field value you may need to change to ensure CloudFront serves the appropriate S3 bucket.
As of now, we have configured the infrastructure to service a request to your site using your custom domain. Route53 has an A record for your custom domain routing to CloudFront. CloudFront will now handle the SSL traffic handshake and forward requests via HTTPS to a local CloudFront cache of your S3 static site that is saved in the CloudFront content distribution network. Your web page loads your set content and the user can now see your web page!
In the next post, I will cover the remaining item where we set up an SSL certificate for free via AWS Route53 and then change some CloudFront configurations to use the SSL certificate for your custom domain.
Share this post
Twitter
Google+
Facebook
Reddit
LinkedIn
StumbleUpon
Pinterest
Email